")
Dealing with a stuck burner valve on your KitchenAid cooktop or a different brand can be very annoying. It can stop you from cooking smoothly. This is a common appliance repair issue. It usually happens because of a broken knob, too much grime, or not enough lubrication. Before you call for professional help, you can try some DIY steps on how to fix a stuck cooktop burner valve yourself.
Common Reasons for Cooktop Burner Valve Sticking
The smooth running of your cooktop depends on many parts working well together. If a burner valve is stuck, it could mean there’s a problem with the control knob or the valve itself. One frequent reason is food spill. When food boils over or splashes while cooking, it can get into the area around the control knob and harden. This makes it hard to turn.
Another reason could be that the valve mechanism needs lubrication. Over time, the grease that helps the valve move easily can dry out or get dirty. This can cause it to become stiff or stick. Finding the main cause is important to fix it the right way.
Preparing to Fix Your Stuck Cooktop Burner Valve
Before starting the repair, it is important to get the tools you need and follow safety steps. Having everything ready will make the process easier. Safety is also key to making sure you can do the repair safely. Keep in mind that working with gas appliances needs attention to possible dangers.
By doing these preparations, you will be ready to handle the repair well and safely.
Tools and Materials Needed for the Job
To fix your stuck cooktop burner valve, you will need some simple tools. Gathering these before you begin will help a lot. Here’s a list to help you get started:
- Screwdriver: You will need a screwdriver to take off the control knob and maybe other parts of the burner. Make sure you have the right size and type of screwdriver to fit the screws on your appliance.
- Cleaning Cloth: A clean cloth is important to wipe off any dirt or old lubricant. Microfiber cloths are good because they do not leave behind any lint or fibers.
- Lubricant: Pick a lubricant that works for high heat. Do not use WD-40 or other flammable products. They can create a fire risk.
Safety Precautions Before Starting Repairs
Working with a gas cooktop needs you to follow safety precautions to avoid accidents. First, turn off the gas supply before you begin. Find the shut-off valve behind the appliance and turn it to close it.
Make sure the burner and nearby areas are cool. Working on a hot surface can cause burns. If you have used the cooktop recently, wait until it cools down completely.
Also, ensure good ventilation in the kitchen while you work. Open windows and doors to let fresh air in. This will help clear any leftover gas and create a safe space.
Step-by-Step Guide to Fixing a Stuck Cooktop Burner Valve
Now that you have set up your workspace and collected the tools you need, let’s go step by step to fix that stubborn burner valve. If you follow this guide closely, you can ensure a safe and successful repair for your cooktop.
If you find any part of this process hard or feel unsure about it, it’s okay to reach out to a skilled appliance repair expert.
Step 1: Turning Off the Gas Supply
Before you start any repairs on your gas cooktop, it’s important to ensure safety by turning off the gas supply. This will stop gas from flowing to the burner while you work, which helps prevent possible dangers. First, find the shut-off valve for the cooktop.
The shut-off valve is usually behind the appliance, either on the wall or on the floor. Once you find it, turn it to the right to close it. This will completely stop the gas from reaching the cooktop.
After turning off the gas, it’s smart to check if the gas is really off. You can do this by trying to light the burner. If the gas supply is off, the burner will not light up.
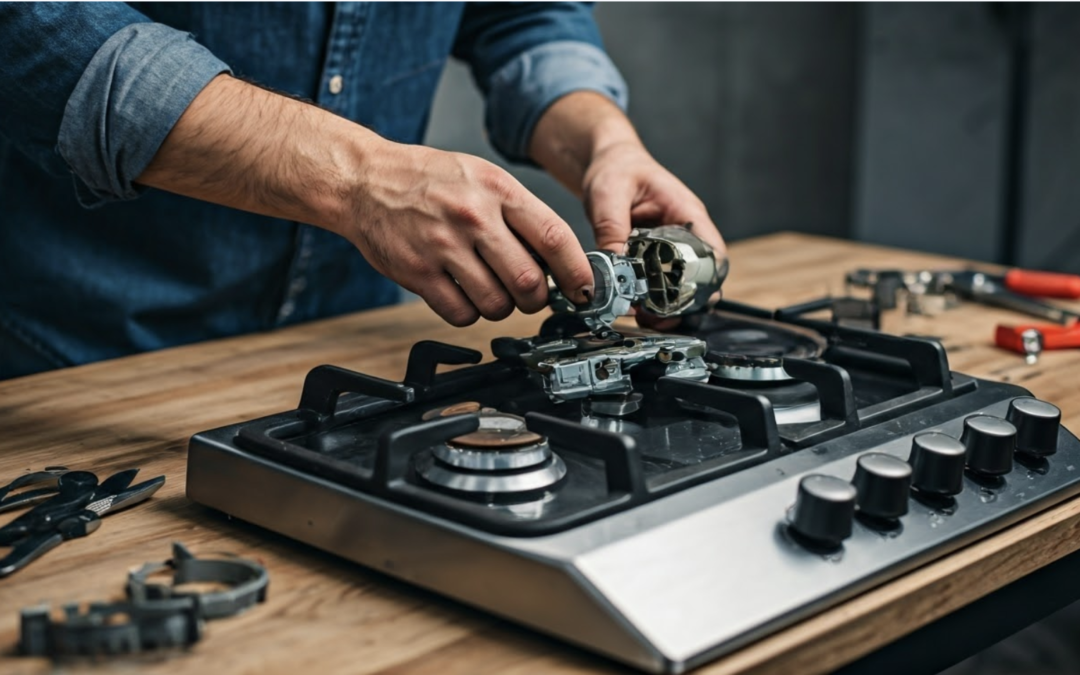
Step 2: Removing the Cooktop Burner Components
With the gas supply turned off, you can now focus on reaching the burner valve. This means removing a few parts, but it is usually easy to do. First, let the burner cool down completely if you just used it.
Next, find the control knob for the burner that is stuck. It should have a clear label. Gently pull the knob straight up to remove it from the valve stem. Some knobs might have a small set screw, which you need to loosen first. If it is hard to remove, check your appliance manual for instructions based on your model.
After you take off the knob, you will have better access to the burner parts below it. Depending on your cooktop model, you might need to take off a burner cap, grate, or burner head. You can do this using your hands or a screwdriver.
Step 3: Accessing and Lubricating the Valve
Having taken off the burner parts, you should now see the valve stem clearly. This is the part where you will put lubricant to fix the sticking problem. Make sure to use a lubricant made for high-heat situations.
Put a small amount of lubricant right on the valve stem. Don’t use too much, as it can attract dirt and other stuff. Move the valve stem back and forth with your fingers. This helps spread the lubricant well and makes it move smoothly.
If you think there’s dirt or grime inside the valve, use a cotton swab or a small, soft brush to clean it gently before adding the lubricant. This will help the lubrication and keep the valve working well.
Step 4: Reassembling and Testing the Cooktop Burner
After you grease the valve, you can put the burner parts back together in the opposite order. Make sure each part is lined up correctly and tightly secured. When the burner is fully put back together, you can check if it works.
Start by turning the gas supply back on. Then, slowly turn the control knob for the repaired burner to the ‘on’ position. You should feel a smooth push and hear the gas ignite.
Make sure the burner lights up properly and that the flame changes when you turn the knob. If the burner works as it should and the sticking problem is fixed, you have done a great job with the repair!
Conclusion
In conclusion, learning how to fix a stuck cooktop burner valve is a handy skill for any home cook. By following these simple steps of removing the burner parts, lubricating the valve, and reassembling everything correctly, you can save yourself the hassle and cost of calling a professional. Regular maintenance of your cooktop burners will ensure they continue to work efficiently and safely. Remember, safety always comes first when dealing with gas appliances, so proceed with caution and always double-check your work before using the burner again. For more DIY tips, check out our blog on How to Unlock KitchenAid Cooktop Quickly.
Frequently Asked Questions
Can I fix a stuck cooktop burner valve on my own?
Yes, if the problem is a stuck control knob caused by debris or not enough lubricant, you can usually fix it by yourself with basic tools. But if you feel uneasy with gas appliances or if the issue keeps happening, it’s best to get professional help.
What should I do if the valve is still stuck after lubrication?
If adding lubricant to the valve does not fix the issue, there might be a bigger problem with the burner or valve mechanism. In these situations, it’s best to call a qualified appliance repair expert. They can diagnose and repair the problem.
How often should I check and maintain my cooktop burner valves?
Cleaning around your control knobs often and using high-heat lubricant on the valve stems every few months can stop them from sticking. Doing this easy maintenance can make your appliance last longer and keep it safe to use.